Archiv der Kategorie: FOSS

News from Open Camping Map

Looking at https://opencampingmap.org one might get the impression that nothing has changed.

This is true as far as the general UI is concerned, however quite a lot has been changed behind the scenes.

BTW, I still would like to have prettier site icons. Probably somebody with better graphic skills than mine can help here!

So here is what has been changed behind the scenes:

In the past I was somewhat frustrated that search engines like Google did not find the link to a particular campsite on my map even if there was no better information somewhere else on the web.

Often search engines come up with mostly useless stuff like https://campingspots.info which is basically just a rip of locations from OpenStreetMap data tagged tourism=camp_site providing no further information.

That they did not find the more useful information on Open Camping Map has mostly technical reasons and is hopefully fixed now.

In the past a campsite description like https://opencampingmap.org/de/way/164951603 has been generated by pure Javascript in the users web browser so no way for a search engine to index this description as these usually can not select sites from interactive maps.

So what I did now is generating a static version of the campsite descriptions on the server side using the same code executed only inside the users web browser before. The result can be seen if Javascript is turned of in the browser. So finally this is something a search engine should now be able to index.

My backend is now running osm2pgsql (flex) instead of imposm and a clever setup allows for faster database updates. I also generate sitemaps for crawlers like Googlebot which should then be able to find and index all the campsites shown on the map.

My most wanted new features for osm2pgsql

In light of the upcoming virtual meetup on osm2pgsql I decided to write a short blogpost about the top five features I want to see in osm2pgsql.

  1. To be able to move my map localisation stuff from PostgreSQL stored procedures to the data import stage I will need the get_bbox() feature of the new flex output driver to also work for relations. The reason is, that I do geolocation aware transcription which would not be possible on relations without such a function. This will then hopefully recover my development of the German map style.
  2. The flex backend has a new feature which will allow to pass information from a relation to its members. Currently this works for ways only but would be very nice to have for nodes and relations as well. What I think about where such a feature will be handy is for rendering of site relations.
  3. There are many ways to import OSM data into PostgreSQL, but if the target database needs to be kept up to date with osm there are only two options left. These options are imposm and osm2pgsql.Unfortunately there are features which are not available on both applications. Currently imposm will need rougly half the storage size osm2pgsql uses for updating. The main reason for this is the usage of LevelDB which might also be an option for osm2pgsql.
  4. Another feature which imposm provides is support for generalized tables for rendering low zoom objects which would be nice to have in osm2pgsql as well.
  5. Finally I would like to see support for geometries to be stored in TWKB format which will help to further reduce the storage size of production databases.

Why development of German OSM Carto style is currently stuck.

I am the Maintainer of the German Style OSM Carto fork and operator of http://tile.openstreetmap.de for a couple of years now. Usually I try to follow upstream releases as fast as possible to make sure that the fork keeps as close to upstream as possible.

However, back in March OSM Carto v5.0.0 has been released which requires a reimport of the osm2pgsql database. As doing this is a lot of work for my small two-server setup maintained by a single person I decided to combine this reimport with a new Approach for map localization I have been thinking about for some time. The code is designed for the new osm2pgsql Flex Backend introduced by Jochen Topf in February. Unfortunately I did not look closely enough at the Flex Backends documentation. I missed the fact, that the get_bbox()function is currently not available on relations which would force me to disable localization for relations. I decided against doing this for now in the hope that Jochen will add this missing feature to his code soon. If this situation will persist till the end of the year I will likely have to think about another solution, but for now we will unfortunately just have to wait.

Die deutsche Corona Warn App und die Datensparsamkeit

Leider gibt es in der Smartphonewelt nicht wirklich die Option ähnlich wie beim Desktop PC ein datensparsames Betriebssystem wie Debian GNU/Linux zu verwenden.

Die zweitbeste Lösung besteht darin ein Android auf Basis des Android Open Source Projekts (AOSP) wie LinageOS zu verwenden.

Leider ist man auch in diesem Fall in der Praxis trotzdem oft dazu gezwungen das proprietäre Paket GSF von Google zu installieren, weil viele Programme dieses benötigen.

Ohne Anmeldung im Play-Store bei Google ist man aber trotzdem zumindest pseudonym unterwegs und kann die meiste Software über freie Alternativen wie FDroid und Aurora-Store installieren.

Nicht so bei der Corona Warn App. Diese beschwerte sich erst mal über fehlende Aktualität des Play-Stores obwohl dieser installiert (aber nicht konfiguriert und deaktiviert) ist.

Ich war also erst einmal nicht in der Lage die App auf einem solchen datensparsamen System zu verwenden. Das ist Schade, weil bei der App selbst vieles richtig gemacht wurde.

Richtig herausgefunden wo genau das Problem lag habe ich leider nicht. Nachdem der Play-Store in den Settings aktiviert aber immer noch nicht konfiguriert wurde tut die Software anscheinend erst einmal.

Announcing Open Camping Map

When I started mapping the then newly established backcountry campsites in the Black Forest back in 2017, I discovered, that the current mapping quality of campgrounds in Openstreetmap is actually quite poor. Unfortunately this situation did not improve that much since then.

Being active in OSM for more than 10 years now, I also know that improvements will only happen, when there is an appropriate special interest map which will help motivate people to improve tagging.

So here comes Open Camping Map!

It is provided in the hope, that it will help getting mappers to improve the tagging. There is a bugs section and an edit button besides the actual info about a particular site. The Map will likely be of interest also to camping enthusiasts just looking for a site in a particular area.

Some statistics about the current (bad) state of campsites in Openstreetmap. There are about 120000 camping and caravan sites in our database. About 35000 of them do not even have a name tag. Another 39000 of them do only have a name tag and nothing else. Thus about half of the campsite data in Openstreetmap is of no further value than drawing a (sometimes named) tent on a rendered map.

Wouldn’t it be nice to use Openstreetmap to locate a suitable campsite for your next bicycle or hiking trip or just for your ordinary summer camping holiday?

I do think so, thus lets start and improve the map.

This task is even suitable for armchair mappers as most of the campsites do have a website nowadays. Probably I should also think about adding this to StreetComplete or MapRoulette challenge.

Finally here are some issues I came about while coding this map:

  • Duplicating campsites as node and way ist not a good idea. Please map the area only.
  • Please add at least some contact data to make the data useful for potential customers of a site.
  • caravan only pitches inside a campsite should not to be tagged as caravan_site.camp_site=camp_pitch would be a better option.
  • I invented a tag called permanent_camping=yes,no,only as it is common on many sites in Germany, that people rent a pitch on a seasonal basis and do not move their caravan for years. There are even sites where this is the only option.

So where will I go from here. I intend to make the map multilingual and probably add more improvement on the next Karlsruhe Hack Weekend. I will be happy about further suggestions for improvements or (even better) patches.

The backend is based on PostGIS and Imposm and the associated configuration is also available at GitHub. It is likely suitable for other POI maps. Thus feel free to contact me if you like to build one! The most easy frontend for such a map will likely be uMap.

Happy campsite mapping!

Some thoughts about localization of Openstreetmap based maps

Following this tweet about a request of localized maps on osm.org I would like to share some thoughts on this topic.

My first versions of the localization code used in German style dates back to 2012. Back then I had the exact same problem as Laurence using OSM based maps in regions of the world where Latin script is not the norm and thus I started developing the localization code for German style.

Fortunately I was able to improve this code in December 2015 as part of a research project during my day job.

I also gave some talks about it in 2016 at FOSSGIS and FOSS4G conferences.
Recordings and slides of these talks are available at the l10n wiki.

Map localization seems to be mostly unprecedented in traditional GIS applications as before Openstreetmap there was no such thing as a global dataset of geographical data.

Contrary to my initial thought doing localization “good enough” is not an easy task and I learned a lot of stuff about writing systems that in fact I not even wanted to know.

What I intend to share here is basically the dos and don’ts of map localization.

Currently my code is implemented mostly as PostgreSQL shared procedures, which was a good idea back in 2012 when rendering almost always involved PostgreSQL/PostGIS at some stage anyway. This will likely change in a vector tile only tool chain used in future. To take this into account in the meantime I also have a proof of concept implementation written in python.

So what is the current state of affairs?

Basically there are two functions which will output either a localized street name or place name using an associative array of tags and a geometry object as input. In the output street names are separated by “-” while place names are usually two-line strings. Additionally street names are abbreviated whenever possible (if I know how to do this in a particular language). Feel free to send patches if you language does not contain abbreviations yet!

Initialy I used to put the localized name in parenthesis, but this is not a very good idea for various reasons. First of all which one would be the correct name to put in parenthesis? And even more important, what would one do in the case of scripts like arabic or hebrew? So I finaly got rid of the parenthesis altogether.

What else does the code in which way and whats the rationale behind it?

There are various regions of the world with more than one official language. In those regions the generic name tag will usually contain both names which will just make sense if only this tag is rendered like osm carto does.

So what to do in those cases?

Well if the desired target language name is part of the generic name tag just use this one and avoid duplicates at any cost! As an example lets take Bolzano/Bozen in the autonomous province South Tyrol. Official languages there are Italian and German thus the generic name tag will be “Bolzano – Bozen”. Doing some search magic in various name tags we will end up using “Bolzano\nBozen” in German localization and using “Bolzano – Bozen” unaltered in English localization because there is no name:en tag.

But what to do if name contains non latin scripts?

The main rationale behind my whole code is that the mapper is always right and that automatic transcription should be only used as a last resort.

This said please do not tag transcriptions as localized names in any case because they will be redundant at best and plain wrong at worst. This is a job that computers should be able to do better. Also do never map automated transcriptions.

Transcriptions might be mapped in cases when they are printed on an official place-name sign. Please use the appropriate tag like name:jp_rm or name:ko-Latn in this case and not something like name:en or name:de.


(Image ©Heinrich Damm Wikimedia Commons CC BY-SA 3.0)

Correct tagging (IMO) should be:
name=ถนนเยาวราช
name:th=ถนนเยาวราช
name:th-Latn=thanon yaoverat
name:en=CHINA TOWN

So a few final words to transcription and the code currently in use. Please keep in mind that transcription is always done as a last resort only in case when there are no suitable name-tags on the object.

Some of the readers may already know the difference between transcription and transliteration. Nevertheless some may not so I will explain it. While transliteration is fully reversible transcription might not always be. So in case of rendered maps transcription is likely what we want to have because we do not care about a reversible algorithm in this case.

First I started with a rather naive approach. I just used the Any-Latin transliteration code from libicu. Unfortunately this was not a very good idea in a couple of cases thus I went for a little bit more sophisticated approach.

So here is how the current code performs transcription:

  1. Call a function to get the country where the object is located at
    (This function is actually based on a database table from nominatim)
  2. If the country in question is one with a country specific transcription algorithm go for this one and use libicu otherwise.

Currently in Japan kakasi is used instead of libicu in order to avoid chinese transcriptions and in Thailand some python code is used because libicu uses a rarely used ISO standard transliteration instead of the more common Royal Thai General System of Transcription (RTGS).

There are still a couple of other issues. The most notable one is likely the fact, that transcription of arabic is far from perfect as vowels are usually not part of names in this case. Furthermore transcription based on pronunciation is difficult as arabic script is used for very different languages.

So where to go from here?

Having localized rendering on osm.org for every requested language is unrealistic using the current technology as any additional language will double the effort of map rendering. Although my current code might even produce some strange results when non-latin output languages are selected.

This said it would be very easy to setup a tile-server with localized rendering in any target language using Latin script. For this purpose you might not even need to use the German Mapnik style as I even maintain a localized version of vanilla OSM Carto style.

Actually I have a Tileserver running this code with English localization at my workplace.

So as for a map with English localization http://www.openstreetmap.us/ or
http://www.openstreetmap.co.uk would be the right place to host such a map.

So why not implementing this on osm.org? I suppose that this should be done as part of the transition to vector tiles whenever this will happen. As the back-end technology of the vector-tiles server is not yet known I can not tell how suitable my code would be for this case. Likely it might need to be rewritten in C++ for this purpose. As I already wrote, I have a proof of concept implementation written in python which can be used to localize osm/pbf files.

A sshd on port 22 hack for Termux on Android

I have always been somewhat skeptic, when it comes to Android. While it is based on the Linux Kernel the Userland is far from the average GNU/Linux system where geeks like me are familiar with for many years now.

I have yet to find some documentation about the way SELinux, the Linux kernel firewall and policy routing are used in Android. The only thing I know about this stuff from digging at the console so far is that they are indeed used.

This is where Termux comes into play. Termux is a console Application which features most of the familiar GNU userland utilities.

There is even an Openssh based sshd for login from a remote machine which is quite handy for console work and file-transfer (e.g. using sshfs).

Unfortunately Android uses a somewhat strange system for isolating applications from each other based on unix user-accounts. Thus, in contrast to our familiar desktop GNU/Linux systems it is not possible for a Termux shell to access data from other applications by default.

This mechanism has two major impacts on our ssh daemon:

  • it does neither make sense to select the desired user on login nor is it possible to switch users for a sshd run by the Termux user anyway
  • ssh (running with the termux userid) will be unable to bind to port 22

For both of those issues it would be nice to have a workaround. I needed to have ssh on port 22 because of a firewall limitation of the eduroam network where my phone is connected to most of the time.

To work around the second issue some kind of sudo mechanism would be needed. For a rooted phone or (even better) a free firmware like LineageOS, which I would recommend tu use, Termux provides a package called tsu which does exactly this.

Back to the sshd on port 22 hack. First I tried to enable file based capabilities (CAP_NET_BIND_SERVICE) on the sshd binary to be able to directly select 22 as the port to bind to. Unfortunately this failed to work likely because of some default SELinux settings I did not understand.

Thus I decided to go for an iptables based approach. Fortunately at least LineageOS does provide an iptables binary.

So here is my runssh script which will run sshd and redirect port 22 to port 8022 (the default Termux ssh port).

#!/data/data/com.termux/files/usr/bin/bash

if [ "$UID" != "0" ]; then
  sshd
  tsu -a -e -c $0
  exit 0
fi

# we are supposed to be root here
# and are able to call iptables
if ! /system/bin/iptables -L PREROUTING -t nat -n |grep -q 8022; then
  echo "setting up redirect form port 22 to 8022"
  /system/bin/iptables -t nat -A PREROUTING -p tcp --dport 22 -j REDIRECT --to-port 8022
fi
Kategorien:

A Matrix Keypad on a Raspberry Pi done right

There are quite a few articles to be found on the Internet on how to use a matrix keyboard on a Raspberry Pi.

Surprisingly none of them seems to use the method documented here.

Instead most of them seem to use some handcrafted Raspberry Pi and python-only solution with debounce logic implemented in userland.

As with my article on Setting up a GPIO-Button “keyboard” on a Raspberry Pi this uses a device tree based approach and will not require any driver code in userland.

As with the solution above an application will be able to use this keyboard just in the same way as any other keyboard (e.g. a standard USB keyboard) connected to a computer running Linux.

So here is how to do it:

To check if the driver is available modinfo matrix-keypad should show you something like this:

pi@raspberrypi:~$ sudo modinfo matrix-keypad
alias:          platform:matrix-keypad
license:        GPL v2
description:    GPIO Driven Matrix Keypad Driver
author:         Marek Vasut <marek.vasut@gmail.com>
srcversion:     54E6656500995BD553F6CA4
alias:          of:N*T*Cgpio-matrix-keypadC*
alias:          of:N*T*Cgpio-matrix-keypad
depends:        matrix-keymap
intree:         Y
vermagic:       4.9.35+ mod_unload modversions ARMv6 p2v8 
</marek.vasut@gmail.com>

To enable the driver we need to create a device tree overlay file suitable for a given matrix keyboard.

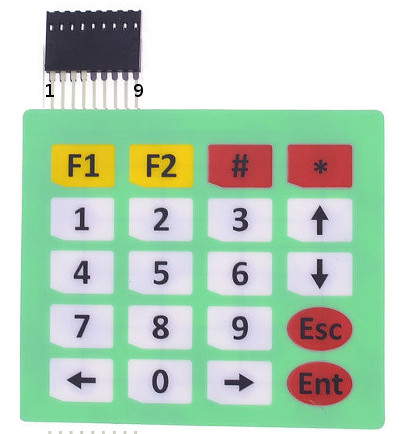
As an example I use the following device available at your favorite china shop.

4x5matrix

Here is what the corresponding device tree overlay file 4x5matrix.dts looks like:

    /dts-v1/;
    /plugin/;
    / {
           compatible = "brcm,bcm2835", "brcm,bcm2708", "brcm,bcm2709";

           fragment@0 {
              target-path = "/";
              __overlay__ {
                 keypad: MATRIX4x5 {
                    compatible = "gpio-matrix-keypad";
                    debounce-delay-ms = <10>;
                    col-scan-delay-us = <10>;
                    /* 
		       try to use GPIO only lines
                       to keep SPI and I2C usable
                    */
                    row-gpios = <&gpio 27 0    // 1
                                 &gpio 22 0    // 2
                                 &gpio 10 0    // 3
                                 &gpio 9 0>;   // 4

                    col-gpios = <&gpio 13 0    // 5
                                 &gpio 26 0    // 6
                                 &gpio 16 0    // 7
                                 &gpio 20 0    // 8
                                 &gpio 21 0>;  // 9
                    /*
                      Keycodes from /usr/include/linux/input-event-codes.h
                      converted to hex using printf '%02x\n'
                    */

                    linux,keymap = <
                                    // col0 row0 KEY_LEFT
                                    0x00000069
                                    // col0 row1 KEY_KP0
                                    0x01000052
                                    // col0 row2 KEY_RIGHT
                                    0x0200006a
                                    // col0 row3 KEY_KPENTER
                                    0x03000060
				    // col1 row0 KEY_KP7
                                    0x00010047
                                    // col1 row1 KEY_KP8
                                    0x01010048
                                    // col1 row2 KEY_KP9
                                    0x02010049
                                    // col1 row3 KEY_ESC
                                    0x03010001
                                    // col2 row0 KEY_KP4
                                    0x0002004b
                                    // col2 row1 KEY_KP5
                                    0x0102004c
                                    // col2 row2 KEY_KP6
                                    0x0202004d
                                    // col2 row3 KEY_DOWN
                                    0x0302006c
                                    // col3 row0 KEY_KP1
                                    0x0003004f
                                    // col3 row1 KEY_KP2
                                    0x01030050
                                    // col3 row2 KEY_KP3
                                    0x02030051
                                    // col3 row3 KEY_UP
                                    0x03030067
                                    // col4 row0 KEY_F1
                                    0x0004003b
                                    // col4 row1 KEY_F2
                                    0x0104003c
                                    // col4 row2 KEY_KPSLASH there is no KP_#
                                    0x02040062
                                    // col4 row3 KEY_KPASTERISK
                                    0x03040037>;

                 };
              };
           };
      };

Further documentation can be found in the file Documentation/devicetree/bindings/input/matrix-keymap.txt inside the Linux kernel source tree. Feel free to ask if it does not work for you.

Now to enable our keyboard there are only four steps left:

  1. Connect the keyboard to the GPIO lines as defined in the dts file
  2. Compile the dts file to the binary dtbo format. This is done using the device tree compiler of your kernel tree:
    ./scripts/dtc/dtc -W no-unit_address_vs_reg -I dts -O dtb -o 4x5matrix.dtbo 4x5matrix.dts
    
  3. Copy the resulting dtbo file to /boot/overlays/4x5matrix.dtbo on the Raspberry Pi
  4. Add the following to /boot/config.txt:
    dtoverlay=4x5matrix
    

Now after rebooting the Pi the lsinput command should show us a new keyboard connected to the device. You may need to install a package called input-utils first if this command ist not available on your Pi.

Here is what this looks like after pressing the Enter Key on the matrix keyboard:

pi@raspberrypi:~$ sudo -s
root@raspberrypi:~# lsinput
/dev/input/event0
   bustype : BUS_HOST
   vendor  : 0x0
   product : 0x0
   version : 0
   name    : "MATRIX4x5"
   bits ev : EV_SYN EV_KEY EV_MSC EV_REP

root@raspberrypi:~# input-events 0
/dev/input/event0
   bustype : BUS_HOST
   vendor  : 0x0
   product : 0x0
   version : 0
   name    : "MATRIX4x5"
   bits ev : EV_SYN EV_KEY EV_MSC EV_REP

waiting for events
19:56:28.727096: EV_MSC MSC_SCAN 24
19:56:28.727096: EV_KEY KEY_KPENTER (0x60) pressed
19:56:28.727096: EV_SYN code=0 value=0
19:56:28.797104: EV_MSC MSC_SCAN 24
19:56:28.797104: EV_KEY KEY_KPENTER (0x60) released
19:56:28.797104: EV_SYN code=0 value=0

Happy hacking!

Setting up a GPIO-Button “keyboard” on a Raspberry Pi

 
Update: If you need more than a hand full of buttons you might be better of using a matrix keyboard instead.

Back in late 2013, when I wrote the first Version of a raspberry-pi based software controlling a HD44780 based 4×20 characters LCD and 4 input buttons I started querying the buttons using the generic GPIO driver included in Raspbian and its sysfs interface.

However, this has a couple of drawbacks. First of all it is hardly portable to other Linux based hardware and one has to do a lot of stuff like debouncing on the application level.

Fast forward to early 2017. Raspbian now uses a device-tree based approach for system setup and a driver called gpio-keys is readily available in its standard kernel.

However, as it is often the case in the Free Software world, the documentation of this driver is limited to some README files included in the Linux kernel and some discussions scattered all around the web.

Linux already has drivers for almost all of the common low level peripheral interfaces like I2C, SPI, OneWire, hardware PWM and generic GPIO. It is usually the better approach to use them instead of constantly re-inventing the wheel.

So here is my quick guide for setting up a “keyboard” made up from a couple of buttons connected via GPIO ports as shown in the image.
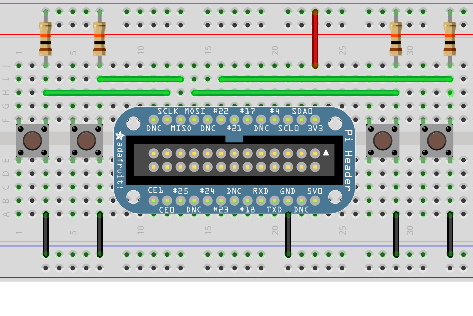
gpio-keys

While this has currently only been tested on Raspberry Pi, it will likely also work on other Linux based boards with device tree enabled (e.g Beaglebone and others).

Keyboards in modern Linux Kernels are presented to userland as a so called input event device. To inspect them I would recommend the installation of the evtest and input-utils packages on Debian/Ubuntu based distributions. The lsinput command (run as root) shows which ones are available on a system.

So, what do we need to do to make a keyboard from our GPIO connected push-buttons?

The missing link between the gpio-keys driver and the setup of the actual GPIO ports, where the buttons are connected to, is a so called device-tree (DT) overlay.

While DT itself is a data structure for describing hardware, a DT overlay is something a user can put in place to change such a hardware description in a way which matches the actual application scenario (like buttons, buses etc. connected to the device).

So let’s build such an overlay for the four buttons shown in our schematic above.
The Documentation available at raspberrypi.org provides some clues about device tree overlays as well.

Here is the final result which works, so let’s go into the details:

    /dts-v1/;
    /plugin/;
    / {
       compatible = "brcm,bcm2835", "brcm,bcm2708", "brcm,bcm2709";
       
       fragment@0 {
          target-path = "/";
          __overlay__ {
             keypad: breadboard_keys {
                compatible = "gpio-keys";
                #address-cells = <1>;
                #size-cells = <0>;
		autorepeat;
                button@22 {
                   label = "breadboard Menu";
                   linux,code = <28>;
                   gpios = <&gpio 22 1>;
                };
                button@10 {
                   label = "breadboard down";
                   linux,code = <108>;
                   gpios = <&gpio 10 1>;
                };
                button@9 {
                   label = "breadboard up";
                   linux,code = <103>;
                   gpios = <&gpio 9 1>;
                };
                button@11 {
                   label = "breadboard enter";
                   linux,code = <14>;
                   gpios = <&gpio 11 1>;
                };
             };
          };
       };
    };

Our overlay fragment contains a keypad called breadboard_keys. This is actually the string which lsinput will show as the actual name of our input device. 22, 10, 9 and 11 are the GPIO port numbers corresponding to the green wires in our schematic.

The file gpio-keys.txt from the Linux Kernel source-tree will show us what our four button definitions need to look like. We need a label, which is arbitrary text, a linux,code which is actually a keycode as defined in /usr/include/linux/input-event-codes.h and we need a gpio definition with two options, the number of the GPIO to use and a boolean value indicating if the button is active low (1, as in our case) or active high (0).

Another thing I would like to point at is the autorepeat keyword. If given this will activate a key-press repeat behavior known from ordinary keyboards. The production of key-press-events will be repeated as long as the button is pressed.

Now how to enable this overlay on Raspberry Pi?
Very simple, once you know how 🙂

First put the above code in a file e.g. breadboard.dts.

Then compile a binary version and put it into the right place:
dtc -I dts -O dtb -o /boot/overlays/breadboard.dtbo breadboard.dts

Finally the following line must be added to /boot/config.txt:
dtoverlay=breadboard

Now we are done.

Here is how this looks like on the software side without any other input devices like keyboards connected:

root@raspberrypi:~# lsinput
/dev/input/event0
   bustype : BUS_HOST
   vendor  : 0x1
   product : 0x1
   version : 256
   name    : "breadboard_keys"
   phys    : "gpio-keys/input0"
   bits ev : EV_SYN EV_KEY EV_REP

root@raspberrypi:~# input-events 0
/dev/input/event0
   bustype : BUS_HOST
   vendor  : 0x1
   product : 0x1
   version : 256
   name    : "breadboard_keys"
   phys    : "gpio-keys/input0"
   bits ev : EV_SYN EV_KEY EV_REP

waiting for events
20:00:23.629190: EV_KEY KEY_BACKSPACE (0xe) pressed
20:00:23.629190: EV_SYN code=0 value=0
20:00:23.749163: EV_KEY KEY_BACKSPACE (0xe) released
20:00:23.749163: EV_SYN code=0 value=0
20:00:23.969176: EV_KEY KEY_DOWN (0x6c) pressed
20:00:23.969176: EV_SYN code=0 value=0
20:00:24.099151: EV_KEY KEY_DOWN (0x6c) released
20:00:24.099151: EV_SYN code=0 value=0
20:00:24.329158: EV_KEY KEY_UP (0x67) pressed
20:00:24.329158: EV_SYN code=0 value=0
20:00:24.439154: EV_KEY KEY_UP (0x67) released
20:00:24.439154: EV_SYN code=0 value=0
20:00:24.669157: EV_KEY KEY_ENTER (0x1c) pressed
20:00:24.669157: EV_SYN code=0 value=0
20:00:24.759176: EV_KEY KEY_ENTER (0x1c) released
20:00:24.759176: EV_SYN code=0 value=0
root@raspberrypi:~# grep breadboard /sys/kernel/debug/gpio
 gpio-9   (                    |breadboard up       ) in  hi    
 gpio-10  (                    |breadboard down     ) in  hi    
 gpio-11  (                    |breadboard enter    ) in  hi    
 gpio-22  (                    |breadboard Menu     ) in  hi    

Finally something which is not strictly on-topic concerning this post. There is something one should know about keyboard like input event devices like this. Pressing a button will send events to all applications normally consuming them (e.g. applications running on Linux console or X-Window system).

This might be an unwanted behavior. If so, your application software needs to issue a EVIOCGRAB ioctl after opening the input device.
4 different Methods of 1-wire access on Raspberry Pi

1-Wire is a bus-system commonly used for temperature sensors. However, there are many more 1-wire devices than just temperature sensors.owfs has been my Linux software of choice for accessing this bus for many years now. As you might have guessed I mainly use it for my brewing software.

While Raspberry Pi does not have a native 1-wire Interface it is still quite easy to connect 1-wire devices to your Pi.

AFAIK, there are 4 methods for connecting 1-wire devices to Raspberry Pi, here are they with their pros and cons.

Method

pros

cons

notes

1. w1-gpio kernel driver

  • most simple interface, just a pullup-resistor needed
  • driver broken in standard Raspbian Kernel
  • unsuitable for large bus lengths
  • owserver needs root privileges
to make this work on a standard raspbian kernel manually apply this patch.
The following stable kernels already include the fix:
≥ 3.0.70
≥3.2.41
≥3.4.37
≥ 3.8.4
≥ 3.9.0

University of Cambridge Computer Laboratory has a nice tutorial on the non-owfs related part.

2. I2C Busmaster (DS2482-X, DS2483)

  • simple 1-chip solution using I2C bus
  • optional galvanic insulation of 1-wire-bus using I2C isolator (e.g. ADUM1250)
  • SMD soldering required
I only tested the DS2483, which is a 3.3V/5V device.
If the owfs-version from Raspbian wheezy is used, the --no_PPM option is needed.
Schematics including the ADUM1250 I2C-isolator are available at my RaspIO Webpage.

3. DS2480B Busmaster on serial port


  • 3.3V/5V level shifter recommended
  • occupies the only serial port available.
  • SMD soldering required
4. DS9490R/DS2490 USB Busmaster

  • In case of DS9490R no soldering required
  • hardware is discontinued
  • occupies one of the two available USB ports
  • To workaround power supply problems an USB-hub might be required

I tend to recommend the I2C solution if more than just a temperature sensor with a short wire is required.